You undoubtedly keep a very close watch on the money coming into your business. You record payments as soon as they come in and deposit them in your company’s bank account. But are you as careful about your purchases?
It’s easy to go out to lunch with a client and forget to save the receipt. You figure it’s not that much money, anyway. Or you pick up a ream of printing paper and a cartridge at the office supply store and neglect to record the purchase. When you disregard even small expenses, you can have two problems. One, your books won’t be accurate. And two, you never know how an extra $42.21 under Meals and Entertainment might affect your income taxes.

QuickBooks Online provides two ways to enter expenses. You can create a record on the site itself. Or you can snap a photo with your phone using the QuickBooks Online mobile app to document the money spent. Here’s how these two methods work.
Documenting At Your Desk
Let’s say you just had lunch with a vendor to discuss some products you’re planning to buy for a project you’re doing for a customer. You charged it to your company credit card, which you track in QuickBooks Online. You still have to enter it as an expense on the site so that when your credit card statement comes, you can match the credit card transaction to the expense you recorded.
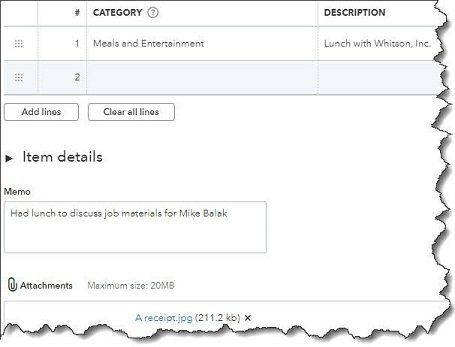
Hover over Expenses in the navigation toolbar and click on Expenses. Click the down arrow in the New transaction button and select Expense. Fill in the fields at the top of the screen with details like Payee, Payment date, and any Tags you want to specify. Under Category details, select the correct category from the drop-down list and enter a Description and Amount.
QuickBooks Online allows you to thoroughly document expenses. You can attach a picture of a receipt if you’d like.
Since you’re going to bill this to the customer as a part of your project fee, click in the Billable box to create a checkmark. Select the Customer/Project. Add a Memo to remind yourself of the reason for the lunch (very important!) and attach a photo of the receipt if you take one. Click Save. Your record of the lunch will now appear on the Expense Transactions screen. It will also show up in the Expenses by Vendor Summary and Unbilled Charges reports, among others.
Recording on the Road
In the example we just went through, attaching a photo of the receipt was the last thing we did to record an expense in QuickBooks Online. There’s another way to document a purchase that starts with a photo of a receipt and should save you a bit of data entry: using the QuickBooks Online mobile app. The app uses Optical Character Recognition (OCR) to “read” the receipt and transfer some of its data to fields on an expense record. (If you haven’t installed the QBO app on your smartphone, you should. You can do a lot of your accounting work that synchronizes automatically with QBO. It’s free, too.)
Open the app and log in. On the opening screen, you’ll see an icon labeled Snap Receipt. Click on it, and your phone’s camera will open (you’ll be asked for permission to use it). Position your phone over the receipt and move it around until you see the blue box covering the content of the receipt. Take the picture. You’ll see it displayed on the phone with a message saying, “Use this photo.” If it seems OK, click the link.
A message on the screen will tell you that the upload is complete and that the app is extracting the information from it. Click “Got it!” It should only take about a minute for your receipt to appear in the list on the Receipt snap screen. You’ll see the details that the app has pulled from your receipt. Tap the matching expense and click Done on the next screen.

You can snap a photo of the receipt in the QuickBooks Online mobile app, and some fields will be automatically entered on a receipt form in QBO.
When you’re back at your computer, open QuickBooks Online and go to Transactions | Receipts. At the end of the row that contains your receipt, click the down arrow next to Delete and select Review. QBO will display the partially-completed receipt form next to the photo you took of the receipt. Fill in any missing fields and save the transaction. Click Create expense on the screen that opens. Then open the Expenses menu and select Expenses, and there should be an entry for the receipt you just added.
This tool isn’t perfect, of course. Every receipt has different fields in different places, and sometimes they’re just not very readable. But in our tests, the app picked up an average of four fields.
Documenting your expenses using one of these two methods is so important. It will help you remember why you stored the receipt and make your reports more accurate. As long as you’re categorizing each transaction correctly, it will also make your tax preparation easier and faster and ensure that you’re charging customers for billable expenses. And if you’re ever audited, your careful work will come in handy.
QuickBooks Online does expense management well, but there are enough moving parts in these recording tools that you may have some questions. We’re here, as always, to answer them.